If you are searching for a dessert that marries the sophisticated flavors of a classic Italian bistro with the comforting, handheld joy of a bakery-style cookie, look no further than these Tiramisu Cookie Cups. This recipe transforms the traditional layers of ladyfingers and espresso-soaked cream into a structurally sound, visually stunning treat that is perfect for any occasion.
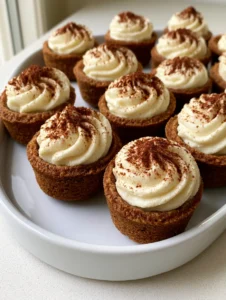
Imagine biting into a crisp, golden-brown baked chocolate cookie crust that gives way to a cloud-like, pale ivory whipped mascarpone cream. The experience is finished with a sophisticated, bitter-sweet dusting of fine cocoa powder that dances on the tongue. These mini delights are not just cookies; they are a culinary experience designed to impress the most discerning palates.

Why These Mini Tiramisu Cookie Cups Are a Total Game Changer
This recipe isn’t just another cookie variation; it is a meticulously engineered dessert that balances texture, moisture, and flavor. Here is what makes this particular version stand out in a sea of sweets:
- Structural Integrity: The baked chocolate cookie crust is designed to be sturdy enough to hold the creamy filling without getting soggy, yet tender enough to melt in your mouth.
- Visual Sophistication: Every cup features a perfectly formed, golden-brown rim and a velvety smooth center, mimicking the look of professional patisserie work.
- Pure Flavor Profile: By using high-quality mascarpone and a fine cocoa dusting, we achieve that signature “pick-me-up” flavor without the mess of a traditional trifle.
- Perfect Portions: These mini cups are ideal for parties, allowing guests to indulge in a rich dessert without needing a plate or fork.
The Anatomy of a Perfect Chocolate Cookie Crust
The foundation of our Tiramisu Cookie Cups is the chocolate crust. Unlike a standard brownie or a soft-baked cookie, this crust needs to act as a vessel. We achieve this by using a high-butter-content dough that creates a shortbread-like texture.
Unsalted Butter (1 cup / 225g): We use softened butter to create a tender crumb. It provides the necessary fat to ensure the crust is rich and flavorful. Make sure it is at room temperature (about 68°F / 20°C) to cream properly with the sugars.
Granulated Sugar & Brown Sugar (1/2 cup / 100g each): The combination of both sugars ensures a crisp edge and a slightly chewy bottom. The molasses in the brown sugar helps achieve that specific golden-brown hue mentioned in our visual blueprint.
Dutch-Process Cocoa Powder (1/3 cup / 30g): For the crust, we want a deep chocolate flavor that isn’t overly acidic. Dutch-processed cocoa provides a smooth, dark profile that contrasts beautifully with the pale ivory filling.
All-Purpose Flour (2 1/4 cups / 280g): This provides the structure. We want enough gluten development to hold the “cup” shape during the baking process without making the cookie tough.
Creating the Pale Ivory Whipped Mascarpone Filling
The heart of these Tiramisu Cookie Cups is the filling. Traditional tiramisu uses a sabayon (egg yolk and sugar mixture), but for these cookie cups, we require a more stable, pipeable cream that can sit at room temperature during a party.
Mascarpone Cheese (8 oz / 225g): This Italian cream cheese is the star. It is much higher in fat than American cream cheese, giving it a silky, buttery mouthfeel. Ensure it is cold when you begin whipping to maintain stability.
Heavy Whipping Cream (1 cup / 240ml): This is folded into the mascarpone to lighten the texture. It transforms a dense cheese into the “thick, smooth, pale ivory-colored whipped cream” seen in the visual prompt.
Powdered Sugar (1/2 cup / 60g): Also known as confectioners’ sugar, this dissolves instantly into the cream, ensuring there is no grittiness in your final dessert.
Pure Vanilla Extract (1 tsp / 5ml) & Espresso Powder (1 tsp / 2g): While the vanilla adds floral notes, the espresso powder is the “invisible” ingredient that bridges the gap between a generic cream and a true tiramisu flavor.

Essential Equipment for Professional Results
To achieve the “perfectly formed” look described in our culinary blueprint, you will need a few specific tools. Precision is the key to making these look like a handheld smartphone photo from a high-end food blog.
Mini Muffin Tin: This is the mold for your cups. A standard 24-count mini muffin tin is the ideal size for a two-bite dessert.
Small Tart Tamper or Teaspoon: Immediately after the cookies come out of the oven, they will be puffy. You need a tamper or the back of a measuring spoon to press the centers down while they are still warm to create the “cup” shape.
Piping Bag with a Large Round Tip: To get that “filled to the top” look with a smooth surface, a piping bag is non-negotiable. Spoons will create messy edges; a piping bag ensures a clean, ivory finish.
Fine-Mesh Sieve: This is used for the final cocoa powder dusting. It ensures the powder is “finely and evenly” distributed, avoiding clumps that can be unpleasant to eat.
Step-by-Step Instructions: Crafting the Perfect Cup
Phase 1: Preparing the Chocolate Crust
Start by preheating your oven to 350°F (175°C). In a large bowl or the bowl of a stand mixer, cream together the room-temperature butter and both sugars until the mixture is light and fluffy. This should take about 3 minutes on medium-high speed.
Add one large egg and vanilla extract, beating until fully incorporated. In a separate bowl, whisk together your flour, cocoa powder, baking soda, and a pinch of salt. Gradually add the dry ingredients to the wet ingredients on low speed until a thick dough forms.
Scoop about 1 tablespoon (15g) of dough into each well of your ungreased mini muffin tin. You don’t need to grease the pan, as the high butter content in the dough will prevent sticking. Bake for 10-12 minutes. Look for the visual cue: the edges should be set and the tops slightly cracked, showing a deep golden-brown chocolate color.
Phase 2: Forming the Cups
This is the most critical step for the “Visual Recipe Blueprint.” As soon as you remove the tin from the oven, use your tart tamper or a small spoon to firmly press into the center of each cookie. This creates the well for our cream. Let them cool completely in the pan before attempting to remove them; this allows the “golden-brown baked chocolate cookie crust” to firm up and become structurally sound.
Phase 3: Whipping the Mascarpone Filling
While the crusts cool, prepare the filling. In a chilled bowl, beat the cold mascarpone cheese, powdered sugar, and espresso powder until smooth. In a separate bowl, whip the heavy cream until stiff peaks form. Sensory cue: the cream should hold its shape when you lift the whisk, looking like thick, white peaks.
Gently fold the whipped cream into the mascarpone mixture using a spatula. Do not over-mix, or you will lose the “thick, smooth” texture. The final result should be a pale ivory color with a velvety appearance.
Phase 4: Assembly and Finishing Touches
Transfer the filling into a piping bag. Pipe the cream into each cooled cookie cup, filling it just slightly above the rim to ensure it looks “filled to the top.” Use a small offset spatula to smooth the top if necessary, though a steady piping hand usually leaves a perfectly smooth surface.
Just before serving, place a tablespoon of cocoa powder into a fine-mesh sieve. Hold it over the tray of cookie cups and gently tap the side of the sieve. Watch as the “dark brown cocoa powder” settles “finely and evenly” over the ivory cream, creating that iconic tiramisu look.
Expert Tips for Success
- Chill Your Bowl: When whipping heavy cream, a cold metal bowl and whisk will help you achieve stiff peaks much faster.
- The “Invisible” Espresso: If you want an even deeper coffee flavor, you can lightly brush the inside of the cooled cookie cups with a mixture of strong brewed espresso and a little Kahlua before adding the cream.
- Avoid Over-Mixing Mascarpone: Mascarpone has a high fat content and can turn into butter if over-beaten. Mix it just until smooth and combined.
- The Cooling Rule: Never fill a warm cookie cup. The mascarpone cream is heat-sensitive and will melt, ruining the visual of the “thick, smooth cream.”
What to Serve With Tiramisu Cookie Cups
These decadent treats are rich and creamy, so they pair best with dishes that offer a bit of contrast. If you are hosting a full dinner party, consider starting with a savory dish like creamy crab imperial or a light, refreshing strawberry pecan chicken salad.
For a summer gathering, these are the perfect follow-up to mediterranean chicken tacos or a zesty creamy elote dip. If you’re looking for more easy hosting ideas, check out our guide on summer crockpot recipes to keep your kitchen cool while you focus on these delicate desserts.
Storage and Make-Ahead Advice
These Tiramisu Cookie Cups are best enjoyed the day they are made to ensure the crust remains crisp. However, you can store them in an airtight container in the refrigerator for up to 3 days. Note that the cocoa powder will eventually absorb moisture from the cream and turn dark/wet; if making ahead, wait to dust with cocoa until just before serving.
You can bake the cookie crusts up to 2 days in advance. Store the empty cups at room temperature in a sealed container and fill them on the day of your event for the best texture.
Frequently Asked Questions
Yes, you can substitute the all-purpose flour for a high-quality 1:1 gluten-free baking flour. The texture may be slightly more fragile, so handle with care.
While you can use cream cheese, it will result in a tangier, denser filling. Mascarpone is traditional for Tiramisu because of its high fat content and buttery, mild flavor.
Yes, because the filling contains mascarpone and heavy cream, these must be stored in the refrigerator. They can stay out at room temperature for about 2 hours during serving.
Cocoa powder naturally absorbs moisture from the cream. To keep it looking ‘fine and dusty,’ apply it using a sieve just minutes before you plan to serve the dessert.
Cookie cups can go flat if the dough is too warm or if they aren’t ‘tamped’ immediately after baking. Ensure you press the centers down while the cookies are still hot from the oven.
The Ultimate Tiramisu Cookie Cups Recipe

Tiramisu Cookie Cups: The Ultimate Bite-Sized Italian-Inspired Dessert
Ingredients
Equipment
Method
- Cream butter and sugars. Mix in egg and vanilla. Combine with dry ingredients to form a dough. Place 1 tbsp balls in mini muffin tin. Bake at 350°F (175°C) for 10-12 minutes.
- Immediately after baking, use a tart tamper to press down the center of each cookie to create a cup shape. Cool completely.
- Beat cold mascarpone, powdered sugar, and espresso powder until smooth. In a separate bowl, whip heavy cream to stiff peaks, then fold into mascarpone.
- Pipe the pale ivory cream into the cooled chocolate cups. Dust evenly with cocoa powder using a fine sieve.
Notes
Dust with cocoa powder right before serving to prevent it from getting wet.

Closing & Call to Action
These Tiramisu Cookie Cups are the perfect marriage of a classic Italian dessert and a modern, handheld treat. With their golden-brown chocolate crust and velvety ivory mascarpone filling, they are guaranteed to be the star of your next dessert table. The contrast of the bitter cocoa dusting against the sweet, rich cream creates a flavor profile that is truly unforgettable.
If you enjoyed this recipe, please leave a comment below and let us know how they turned out! Don’t forget to share your creations on social media and follow us on Pinterest for more culinary inspiration.