There is a specific, intoxicating aroma that fills a kitchen when butter begins to transform. It starts with the gentle hiss of moisture evaporating and ends with a deep, nutty fragrance that signals the arrival of “beurre noisette.” This brown butter frosting recipe captures that culinary magic, turning a standard topping into a sophisticated, toffee-like masterpiece that elevates any dessert it touches.
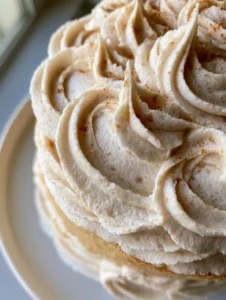
When you look at a perfectly frosted cake, you aren’t just seeing sugar and fat; you are seeing the result of precise temperature control and aeration. This particular buttercream is distinguished by its warm ivory hue and the tiny, toasted amber specks of milk solids that dance throughout the thick, velvety swirls. It is the gold standard for bakers who want to move beyond the cloying sweetness of traditional American buttercream.
Imagine a moist, golden vanilla layer cake, its soft yellow crumb peeking through dense ridges of frosting. This brown butter frosting recipe provides the structural integrity needed for high-altitude swirls while maintaining a melt-in-your-mouth texture that feels like pure luxury on a white ceramic plate. Whether you are a seasoned pastry chef or a home enthusiast, mastering this frosting is a rite of passage.

Why This Toasted Milk Solid Frosting is a Game Changer
- Unparalleled Depth of Flavor: Unlike standard buttercream, this version uses the Maillard reaction to create notes of toasted hazelnuts and salted toffee.
- Visually Stunning Texture: The presence of amber-colored milk solid specks provides a rustic yet elegant aesthetic that proves the frosting is made from scratch.
- Perfect Structural Integrity: This frosting is dense and creamy, making it ideal for multi-layered cakes where stability is just as important as taste.
- Balanced Sweetness: The nutty bitterness of the browned butter cuts through the confectioners’ sugar, resulting in a more sophisticated palate.
The Essential Science Behind These Gourmet Ingredients
To achieve the specific visual and textural results seen in professional bakeries, we must select our ingredients with forensic precision. Each component in this brown butter frosting recipe serves a structural and chemical purpose.
Unsalted High-Fat Butter: You will need 1 cup (227g) of high-quality unsalted butter. Since we are concentrating the flavor by browning it, starting with a butter that has a high butterfat content (82% or higher) ensures a creamier mouthfeel and more abundant toasted milk solids.
Powdered Confectioners’ Sugar: Use 4 cups (500g) of finely sifted powdered sugar. This provides the “body” of the frosting and reacts with the fat to create a stable matrix that can hold its shape in thick, swirling peaks.
Heavy Whipping Cream: 2 tablespoons (30ml) of cold heavy cream are essential for achieving that “visibly creamy” look. The liquid helps dissolve the sugar crystals further, preventing a gritty texture and adding a silkiness that mimics professional ganache.
Vanilla Bean Paste or Extract: 1 tablespoon (15ml) of vanilla bean paste is preferred. The tiny black seeds of the vanilla bean complement the amber specks of the butter, enhancing the “warm ivory” visual profile of the final product.
Fine Sea Salt: ½ teaspoon (3g) of fine sea salt is the “invisible” hero here. It sharpens the toasted notes of the butter and ensures the frosting doesn’t taste flat or cloyingly sweet.
Must-Have Equipment for Perfect Beurre Noisette
To execute this brown butter frosting recipe with precision, you need tools that allow for sensory monitoring. A light-colored stainless steel skillet is non-negotiable; using a dark or non-stick pan makes it nearly impossible to see the color change of the milk solids, leading to burnt, bitter butter.
A stand mixer fitted with the paddle attachment is also vital. While a hand mixer works, the paddle attachment of a stand mixer incorporates less air than a whisk, resulting in the dense, thick, and smooth texture required for those iconic buttercream ridges. Finally, a heat-proof glass bowl is necessary for cooling the butter back to a semi-solid state before whipping.

Step-by-Step Evolution of the Perfect Brown Butter Frosting
Achieving the Golden Amber Transformation
Place your 1 cup (227g) of butter in a light-colored skillet over medium heat. As the butter melts, it will begin to bubble and pop—this is the water escaping. Stay close and stir constantly with a heat-resistant spatula.
Listen for the sound cues: the popping will subside, and a quiet foam will rise to the surface. Look for the visual transition from yellow to a toasted tan. Once you see tiny amber specks settling at the bottom and smell a fragrance like toasted nuts, immediately remove the pan from the heat.
The Critical Cooling Phase
Pour the browned butter, including every single one of those toasted amber specks, into a heat-proof bowl. This is a crucial step in our brown butter frosting recipe: you must let the butter cool until it reaches a soft, room-temperature solid state (about 65°F or 18°C).
If the butter is too liquid, your frosting will break; if it is too hard, it will be lumpy. The butter should look opaque and hold an indentation when pressed with a finger, yet still feel supple and creamable. This usually takes 1-2 hours on the counter or 30 minutes in the refrigerator (stirring every 10 minutes).
Whipping the Ivory Foundation
Transfer the solidified brown butter to your mixer bowl. Beat on medium-high speed for 3-5 minutes. You are looking for a visual change: the butter will lighten in color, moving from a deep tan to a pale, warm ivory as air is incorporated into the fat molecules.
Building the Dense, Swirling Peaks
Turn the mixer to low and gradually add the 4 cups (500g) of sifted powdered sugar, one cup at a time. Once incorporated, add the vanilla bean paste, sea salt, and heavy cream. Increase the speed to medium and beat for another 2 minutes.
Stop the mixer and use a silicone spatula to hand-fold the frosting for 30 seconds. This removes large air bubbles, ensuring the frosting is “dense and creamy” rather than bubbly, allowing you to achieve those smooth, sharp peaks on your vanilla cake.
Expert Tips for Bakery-Quality Results
- Sift Twice: For the smoothest brown butter frosting recipe, sift your powdered sugar twice. This eliminates stubborn clumps that the paddle attachment might miss.
- Temperature Control: If your kitchen is hot, your frosting may feel soft. Chill the entire mixing bowl for 10 minutes before the final whip to regain that “thick and dense” consistency.
- Don’t Waste the Brown Bits: Those amber specks are the concentrated flavor. Use a flexible spatula to scrape every last bit out of the skillet—they are the soul of this recipe.
- The “Vortex” Method: When browning, swirl the pan in a circular motion to keep the milk solids from sticking to one spot and burning.
Storing and Reviving Your Buttercream
This frosting can be made in advance, which is perfect for busy hosting schedules. Store it in an airtight container in the refrigerator for up to 7 days. Because of the high butter content, it will become very firm when cold.
To reuse, let it sit at room temperature for 2-3 hours until it softens. Return it to the stand mixer and whip it on medium speed for 1-2 minutes to restore its creamy, swirling texture. You can also freeze this frosting for up to 3 months; thaw it overnight in the fridge before following the revival steps.
What to Pair With This Nutty Masterpiece
While this brown butter frosting recipe is the star of any vanilla cake, its flavor profile is incredibly versatile. For a sophisticated dessert spread, serve a cake frosted with this buttercream alongside a refreshing Vietnamese Noodle Salad for a light lunch contrast.
If you’re hosting a backyard gathering with BBQ Chicken Nachos, this frosting provides a rich, sweet finish to the smoky meal. It also pairs beautifully with fruit-forward desserts; try using any leftover frosting as a dip for slices of homemade pineapple bread or as a filling for a modified pistachio-themed tart.
Frequently Asked Questions About Brown Butter Buttercream
You can, but you should omit the additional sea salt. However, unsalted butter is preferred because it allows you to control the salt levels and often contains less water, resulting in better browning.
Yes, because it contains heavy cream and butter, any cake frosted with this should be refrigerated if not consumed within 2 hours. However, serve it at room temperature for the best texture.
To achieve a lighter ivory color, whip the solidified brown butter alone for at least 5 minutes before adding sugar. The more air you incorporate, the lighter the color will become.
If the frosting is too soft, the butter may have been too warm. Chill the entire bowl in the fridge for 15 minutes, then re-whip. You can also add an extra 1/4 cup of powdered sugar to increase stability.
Graininess usually occurs if the powdered sugar wasn’t sifted or if the butter was too cold when mixed, preventing it from fully emulsifying with the liquids. Always sift your sugar and ensure your butter is at 65°F (18°C).
The Ultimate Brown Butter Frosting Recipe

Brown Butter Frosting Recipe: The Ultimate Guide to Creamy, Nutty Ivory Buttercream
Ingredients
Equipment
Method
- Place butter in a light skillet over medium heat. Stir constantly as it melts and begins to bubble.
- Watch for the foam to subside and amber specks to form at the bottom. Once it smells nutty, remove from heat immediately.
- Transfer butter and specks to a bowl. Let cool until it is a soft, room-temperature solid (65°F).
- Beat the solidified brown butter for 3-5 minutes until it turns a warm ivory color.
- Gradually add sifted powdered sugar on low speed until combined.
- Add vanilla, salt, and cream. Beat on medium for 2 minutes, then hand-fold to remove air bubbles.
Notes
Sifting the sugar is mandatory for the professional 'swirling' look.

Mastering the Art of Beurre Noisette
Creating this brown butter frosting recipe is more than just a baking task; it is an exercise in sensory awareness. From the sound of the sizzling butter to the sight of the ivory peaks, every step contributes to a final product that is visually stunning and culinarily superior. The deep, toffee-like notes and the signature amber specks will make this your most requested recipe for years to come.
We would love to see your creations! If you frost a cake using this guide, please leave a comment below and share your success. For more visual inspiration and decadent dessert ideas, follow us on Pinterest and join our community of passionate home cooks.