There is a specific visual magic that happens when a heap of BBQ Chicken Nachos emerges from a hot oven. Imagine crunchy, toasted golden corn tortilla chips acting as the structural foundation for a mountain of savory goodness. Every chip is meticulously layered with shredded chicken breast that has been tossed in a thick, glossy, dark reddish-brown BBQ sauce that shimmers under the light.
But the visual feast doesn’t stop at the protein. Copious amounts of melted, bubbly, and slightly browned Colby Jack cheese stretch between every single layer, creating those iconic cheese pulls we all crave. To finish, a vibrant array of thin fresh green jalapeño rounds, finely diced raw red onion, and scattered whole fresh cilantro leaves provide a pop of color and a burst of garden-fresh flavor.
Finally, a precise, creamy white ranch dressing and extra BBQ sauce zig-zag across the top, creating a professional culinary finish that looks like it belongs on a high-end gastropub menu. This recipe isn’t just about throwing things on a tray; it’s about culinary architecture and flavor balance that satisfies every sensory cue from the first crunch to the last spicy bite.

Why These Loaded BBQ Nachos Outshine the Rest
- Structural Integrity: We utilize thick-cut, toasted golden corn tortilla chips to ensure every bite holds up under the weight of the heavy toppings without becoming a soggy mess.
- The Glossy Sauce Secret: By tossing the shredded chicken in the BBQ sauce before baking, we achieve a deeply caramelized, glossy finish that mimics the “low and slow” texture of competition-grade barbecue.
- Dynamic Heat Levels: The combination of fresh green jalapeños and the tang of red onion provides a sharp contrast to the rich, smoky sweetness of the sauce and the creamy ranch.
- The “Bubbly Browned” Factor: Using a high-moisture cheese like Colby Jack ensures a perfect melt, while a quick finish under the broiler creates those desirable charred, bubbly cheese pockets.
The Ultimate Component List for Smoky Loaded Nachos
Thick-Cut Corn Tortilla Chips: 12 oz (340g). Choose chips that are labeled as “restaurant-style” or “thick” to provide the necessary crunch and structural support for the heavy toppings.
Cooked Shredded Chicken Breast: 3 cups (450g). You can use rotisserie chicken for speed, but ensure it is shredded into bite-sized pieces to maximize the surface area for the BBQ sauce to cling to.
Dark Reddish-Brown BBQ Sauce: 1 cup (240ml). Opt for a thick, molasses-based sauce to achieve that iconic glossy visual described in our blueprint; the sugar content is vital for the caramelization process.
Colby Jack Cheese: 3 cups (336g), freshly shredded. This blend offers the perfect ratio of melting capability (Monterey Jack) and sharp flavor/vibrant color (Colby) for that bubbly, browned topping.
Fresh Green Jalapeños: 2 medium. Slicing these into thin, uniform rounds ensures you get a hit of controlled heat and a bright green visual in every section of the tray.
Raw Red Onion: 1/2 small (approx 60g). Finely dicing the onion allows the sharp, pungent flavor to distribute evenly, cutting through the richness of the melted cheese.
Fresh Cilantro: 1/2 cup (15g). We use whole leaves to provide a fresh, herbal finish that visually elevates the dish from “snack” to “artisan appetizer.”
Creamy Ranch Dressing: 1/4 cup (60ml). This serves as the “cooling” zig-zag across the top, providing a creamy white contrast to the dark, smoky BBQ sauce.
Extra BBQ Sauce for Drizzling: 2 tbsp (30ml). A final drizzle ensures that the top layer of chips is just as saucy and flavorful as the hidden layers beneath the cheese.
Foundational Seasonings: 1/2 tsp (3g) fine sea salt and 1/4 tsp (1g) black pepper. Even if your chicken is pre-cooked, a tiny bit of extra seasoning ensures the flavors pop against the corn chips.
Essential Tools for Gastropub-Quality Results
To achieve the “heap” of nachos shown in professional photos, you need a large, heavy-duty rimmed baking sheet. A dark-colored tray can actually help the bottom of the chips stay crisp by absorbing more heat than a shiny silver pan.
You will also need a sharp chef’s knife for those paper-thin jalapeño rounds and a box grater. Always grate your cheese fresh; pre-shredded cheese is coated in potato starch, which prevents it from achieving the “bubbly and browned” texture we are looking for.
The Step-by-Step Blueprint for Perfect Nacho Architecture
Preparing the Glossy BBQ Protein
In a medium mixing bowl, combine your shredded chicken breast with 3/4 cup (180ml) of the BBQ sauce. Toss the chicken thoroughly until every strand is coated and looks glossy and dark reddish-brown.
This is a critical “culinary forensics” step. If you put dry chicken on the chips and then sauce it, the meat will dry out in the oven; pre-coating ensures it stays succulent and develops a glazed finish.
Constructing the Toasted Foundation
Preheat your oven to 400°F (205°C). Spread half of your toasted golden corn tortilla chips in an even layer across the tray, ensuring they overlap slightly to create a solid base.
Top the first layer with half of the saucy chicken and half of the shredded Colby Jack cheese. Repeat with a second layer of chips, chicken, and the remaining cheese, building a “heap” in the center for that handheld smartphone photo aesthetic.
Executing the Bubbly Bake
Slide the tray into the center rack of the oven and bake for 8-10 minutes. Watch for the visual cue of the cheese beginning to bubble and small brown spots forming on the surface of the Colby Jack.
If you want extra “browned” spots like the Midjourney prompt suggests, turn the broiler on for the final 60 seconds. Stay close—the sugars in the BBQ sauce can go from caramelized to burnt very quickly.

The Final Garnish and Zig-Zag Drizzle
Remove the tray from the oven. Immediately scatter the finely diced red onion and the thin jalapeño rounds over the hot, melted cheese so they “set” into the surface.
Fill a small plastic bag with ranch dressing and another with the remaining BBQ sauce, snipping a tiny corner off each. Zig-zag the ranch and sauce across the pile in a precise pattern, then finish with the whole fresh cilantro leaves.
Expert Tips for Nacho Success
- Avoid the “Soggy Chip” Syndrome: Never put watery toppings (like salsa) on before baking. The heat from the oven should crisp the chips, not steam them.
- The Cheese Ratio: Always use more cheese than you think you need. The cheese acts as the “glue” that holds the shredded chicken to the chips.
- Temperature Contrast: The magic of this dish lies in the contrast between the hot, bubbly cheese and the cold, crisp red onion and cilantro. Add the fresh garnishes only after the tray leaves the oven.
- Chicken Prep: If you have time, using leftovers from an Oven-Baked Beef Brisket instead of chicken can provide an even deeper smoky flavor profile.
Preserving the Crunch: Storage and Reheating
Nachos are best enjoyed immediately to experience the full textural contrast. However, if you have leftovers, store them in an airtight container in the refrigerator for up to 2 days.
To reheat, do not use a microwave, as it will turn the chips into rubber. Instead, place them back on a baking sheet in a 350°F (175°C) oven for 5-7 minutes until the cheese is once again bubbly and the chips have regained some of their toasted snap.
What to Serve With BBQ Chicken Nachos
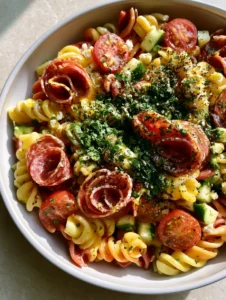
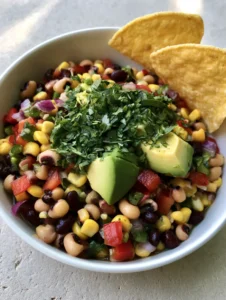
These nachos are a heavy, flavor-packed meal on their own, but they pair beautifully with other regional favorites. To lean into the Southwestern theme, serve them alongside a fresh bowl of Cowboy Caviar for a refreshing bean and corn contrast.
If you are hosting a large game day party, consider rounding out the spread with some Brown Sugar Pineapple Wings or a lighter Santa Fe Chicken Foil Packet for those looking for a lower-carb option. The sweetness of the pineapple in the wings complements the smoky BBQ sauce on the nachos perfectly.
Frequently Asked Questions
The heat level is moderate and comes mainly from the fresh jalapeño rounds. To make them milder, remove the seeds and white membranes from the jalapeños before slicing, or use pickled jalapeños instead.
While Colby Jack is recommended for its color and meltability, you can use Sharp Cheddar or Pepper Jack. However, avoid pre-shredded varieties as they contain anti-caking agents that prevent a smooth, bubbly melt.
Transfer your ranch and BBQ sauce into small piping bags or plastic sandwich bags with a tiny corner snipped off. This allows for the precise zig-zag pattern seen in professional food photography.
To prevent sogginess, use thick-cut chips and avoid adding watery ingredients like salsa or sour cream before baking. Pre-coating the chicken in sauce helps create a barrier, and baking at a high temperature (400°F) ensures the chips stay toasted.
For the best ‘glossy’ look, shred the chicken while it is still warm using two forks or a stand mixer with the paddle attachment. This creates fine strands that hold onto the BBQ sauce more effectively than chunks.
The Ultimate BBQ Chicken Nacho Recipe Card

BBQ Chicken Nachos: The Ultimate Loaded Sheet Pan Feast
Ingredients
Equipment
Method
- In a bowl, toss the shredded chicken with 3/4 cup (180ml) of BBQ sauce until glossy and fully coated.
- On a large tray, layer half the chips, half the saucy chicken, and half the cheese. Repeat with remaining chips, chicken, and cheese.
- Bake at 400°F (205°C) for 8-10 minutes until cheese is bubbly and slightly browned.
- Top with diced red onion, jalapeño rounds, whole cilantro, and zig-zag drizzles of ranch and extra BBQ sauce.
Notes
If using rotisserie chicken, remove the skin before shredding for a cleaner texture.

Closing thoughts on the Perfect Party Platter
These BBQ Chicken Nachos are the ultimate crowd-pleaser, combining the comfort of melted cheese with the sophisticated smoky tang of a well-crafted barbecue sauce. Whether you are prepping for a Sunday football game or just need a fun family dinner, this recipe delivers on every visual and culinary promise.
If you enjoyed this recipe, please leave a comment below and let us know how your “cheese pull” turned out! Don’t forget to share your creations and follow us on Pinterest for more visually stunning recipe inspiration.