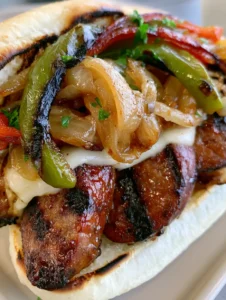
There is something undeniably primal and satisfying about the scent of smoky beef hitting a scorching hot grill. These Grilled Kielbasa Sandwiches represent the pinnacle of backyard comfort food, combining the snap of premium sausage with the silky sweetness of long-cooked onions.
If you are looking for a meal that feels like a gourmet boardwalk treat but can be whipped up in your own kitchen or patio, you have found it. The combination of savory meat, melted cheese, and charred vegetables creates a handheld masterpiece that is both nostalgic and sophisticated.
Inspired by the classic street food vendors of the Northeast, our Grilled Kielbasa Sandwiches focus on high-quality ingredients and specific temperature control. We are moving beyond the basic “hot dog” treatment and elevating the humble kielbasa to center-stage status.

Why These Smokey Kielbasa Hoagies Are a Total Game Changer
- The Perfect Snap: By using thick diagonal slices, we maximize the surface area for the Maillard reaction, ensuring every bite of the beef kielbasa has a crispy, charred edge.
- Structural Integrity: Using melted provolone as a “binder” ensures that your peppers and onions stay inside the roll rather than ending up on your shirt.
- Balanced Textures: You get the crunch of the toasted hoagie roll, the softness of the caramelized onions, and the juicy resistance of the grilled sausage.
- Visually Stunning: The contrast between the dark grill marks, the vibrant red and green peppers, and the fresh green parsley makes this a true “eat with your eyes” experience.
The Anatomy of the Ultimate Grilled Kielbasa Sandwiches
To achieve the result seen in professional culinary photography, every ingredient must serve a specific purpose. We aren’t just throwing things together; we are building layers of flavor and texture that harmonize in every bite.
Beef Kielbasa (1 lb / 450g): We specifically recommend beef kielbasa for its rich, savory depth and superior rendering. The fat content in beef sausage provides a more luxurious mouthfeel when grilled compared to leaner poultry versions.
Hoagie Rolls (4 count): Look for soft white buns that are sturdy enough to hold the weight of the meat but have a tender crumb. Toasting the edges provides a necessary barrier against the juices of the peppers and onions.
Sweet Onions (2 large / 300g): We use Vidalia or Walla Walla onions for their high sugar content. This allows them to become translucent and jammy, providing a sweet counterpoint to the salty sausage.
Bell Peppers (1 red, 1 green / 150g each): Using both colors isn’t just for aesthetics. The red pepper adds a subtle fruitiness, while the green pepper provides an earthy, slightly bitter backbone that cuts through the fat.
Provolone Cheese (8 slices / 180g): Provolone is the ideal choice here because of its low melting point and mild, creamy flavor. It binds the ingredients together without overpowering the smokiness of the meat.
Fresh Parsley (1 tbsp / 4g): A final scatter of finely chopped parsley provides a necessary burst of chlorophyll and freshness. This cuts through the richness of the oil and cheese, brightening the entire flavor profile.
The “Invisible” Essentials: You will need 2 tbsp (30ml) of high-smoke point oil (like avocado or vegetable oil) for searing. A pinch of Kosher salt and freshly cracked black pepper is essential for seasoning the vegetables as they sweat.
Essential Gear for Achieving Professional Char Marks
To replicate the handheld smartphone photo aesthetic of a perfectly grilled sandwich, you need the right tools. A heavy-bottomed cast iron skillet or an outdoor gas/charcoal grill is non-negotiable for those dark, defined grill marks.
You will also want a pair of long-handled stainless steel tongs to flip the sausage slices without piercing the casing, which keeps the juices inside. A sharp chef’s knife is required to get those clean, 45-degree diagonal cuts on the kielbasa.
If you are cooking indoors, a splatter screen is a wise addition to keep your stovetop clean. Finally, a small metal dome or even a large pot lid can be used to trap steam and melt the provolone cheese quickly and evenly.
The Culinary Science of Searing Your Grilled Kielbasa Sandwiches
Phase 1: The Low and Slow Caramelization
Start by slicing your sweet onions into thin half-moons. Heat 1 tbsp (15ml) of oil in your skillet over medium-low heat and add the onions with a pinch of salt.
The salt draws out moisture, allowing the onions to soften without browning too quickly. Cook them for 15-20 minutes, stirring occasionally, until they are translucent and golden-brown.
If the onions start to stick, add a teaspoon of water to deglaze the pan. This process creates the soft, jammy base that defines the Grilled Kielbasa Sandwiches.
Phase 2: Achieving the Perfect Pepper Char
Increase the heat to medium-high and add your red and green bell pepper strips. You want to hear a distinct sizzle the moment they hit the pan.
Leave them undisturbed for 2-3 minutes to develop those blackened, charred edges. The goal is to soften the flesh while maintaining a slight “snap” in the center.
Once the peppers show an oily sheen and visible char marks, remove the entire onion and pepper mixture from the heat and set aside. This ensures the vegetables don’t turn into mush while we prep the meat.
Phase 3: Grilling the Beef Kielbasa
Slice the kielbasa on a sharp 45-degree diagonal into thick ovals. This maximizes the area that touches the heat, leading to more of those delicious crispy edges.
Place the slices on the hot grill or skillet. Look for the meat to slightly curl and the edges to turn a deep, mahogany brown with dark black grill lines.
The “sensory cue” here is the smell of rendered beef fat and the sound of high-heat searing. Once flipped, the sausage should look juicy and plump, reflecting the soft natural daylight in your kitchen.

Phase 4: Toasting and Assembly
Split your hoagie rolls and place them cut-side down on the grill for 30-60 seconds. You are looking for visible toasted edges and a warm, soft center.
Layer the bottom of each roll with the grilled kielbasa slices, overlapping them slightly. Pile a generous amount of the onion and pepper mixture over the top.
Drape two slices of provolone over the hot filling. If using a skillet, cover with a lid for 30 seconds to allow the steam from the hot sausage to melt the cheese into every crevice.
Expert Tips for the Best Grilled Sandwiches
- Temperature Control: Never grill kielbasa on “high” heat for the entire duration. Use medium-high to get the char, then move to a cooler zone to ensure the center is hot without burning the exterior.
- The Steam Trick: To get that professional “bind,” add a teaspoon of water to the pan right before covering it with a lid to melt the cheese. This creates a blast of steam that softens the bun slightly while liquefying the provolone.
- Bun Selection: Avoid overly crusty baguettes which can be difficult to bite through. A “soft white bun” as mentioned in the visual prompt is the gold standard for this specific sandwich.
- Freshness Factor: Always chop your parsley at the very last second. Pre-chopped herbs lose their oils and vibrant green color quickly.
Planning the Rest of Your Menu
These Grilled Kielbasa Sandwiches are a hearty main course, but they truly shine when paired with the right sides. If you are hosting a summer gathering, consider serving them alongside some smoky baked beans with bacon.
For a lighter, crunchier side, a strawberry pecan chicken salad provides a sweet and tangy contrast to the savory sausage. If you’re looking for more hands-off options for a crowd, check out these effortless summer crockpot recipes.
Finally, for a complete outdoor feast, don’t forget a refreshing dessert like this tropical hawaiian cheesecake salad to cleanse the palate after the rich, cheesy sandwiches.
Storage, Reheating, and Make-Ahead Advice
While these sandwiches are best enjoyed fresh off the grill (while the steam is still rising), you can certainly prep components in advance. The onion and pepper mixture can be refrigerated for up to 3 days and reheated in a pan.
We do not recommend freezing the fully assembled sandwich, as the bread will become soggy. However, sliced kielbasa freezes beautifully for up to 2 months.
To reheat a leftover sandwich, use an air fryer at 350°F (175°C) for 3-5 minutes. This will crisp up the roll and melt the cheese without making the meat rubbery.
Frequently Asked Questions
Yes, pork kielbasa works perfectly. Beef kielbasa tends to have a richer flavor, but pork or a pork/beef blend will still yield excellent results with the same cooking method.
Ensure your skillet or grill is preheated to medium-high heat and do not move the sausage slices for at least 2 minutes once they hit the surface.
While provolone is traditional for its melting properties, Muenster, Monterey Jack, or even a mild white cheddar are great substitutes that won’t overpower the sausage.
A soft white hoagie roll or sub bun is best. It should be sturdy enough to hold the ingredients but soft enough to bite through without the filling sliding out.
Slicing on a 45-degree angle increases the surface area of the meat, allowing for more caramelization and a better ratio of charred edge to juicy center in every bite.
The Complete Grilled Kielbasa Sandwiches Recipe
Follow these precise steps to recreate the handheld perfection seen in our visuals. This recipe yields four hearty sandwiches that are sure to become a family favorite.

Grilled Kielbasa Sandwiches with Charred Peppers and Caramelized Onions
Ingredients
Equipment
Method
- Heat 1 tbsp oil in a skillet over medium-low. Add onions and a pinch of salt. Cook until translucent and golden brown (15-20 mins).
- Increase heat to medium-high. Add pepper strips. Sauté until edges are blackened and charred with an oily sheen (5-7 mins). Remove and set aside.
- In the same pan or on a grill, sear the diagonal kielbasa slices until dark grill marks appear and the meat is juicy (3-4 mins per side).
- Place split hoagie rolls cut-side down until the edges are toasted and golden.
- Fill buns with sausage, top with the onion/pepper mix, and drape with provolone. Cover briefly to melt the cheese. Garnish with fresh parsley.
Notes
If you like spice, add a pinch of red pepper flakes to the onions while they caramelize.

Closing & Call to Action
The Grilled Kielbasa Sandwiches are more than just a quick lunch; they are a celebration of simple, high-impact flavors. The combination of the charred beef, sweet onions, and melted provolone is a timeless trio that never fails to impress.
If you enjoyed this recipe, please leave a comment below and let us know how yours turned out! Did you add any extra toppings or use a different type of cheese? We love hearing your kitchen success stories.
Don’t forget to save this recipe to your “Easy Dinners” board on Pinterest so you can find it whenever the craving for a smoky, grilled sandwich strikes! You can also sign up for our newsletter to get more recipes like this delivered straight to your inbox.