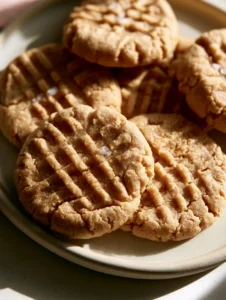
The quest for the perfect Oat Flour Peanut Butter Cookies ends here. If you have been searching for a cookie that boasts a thick, soft center, a delicate matte finish, and that iconic cross-hatch pattern, this recipe is your new gold standard. There is something deeply nostalgic about a peanut butter cookie, but using fine oat flour elevates the texture to a tender, melt-in-your-mouth experience that traditional wheat flour simply cannot replicate.
Imagine pulling a tray out of the oven where every cookie is perfectly uniform, glowing with a light golden-brown hue, and finished with a shimmering pinch of flaky sea salt. The aroma of roasted peanuts fills your kitchen, promising a treat that is as wholesome as it is indulgent. These cookies are designed for the modern baker who values both nutritional density and artisanal aesthetics, looking just as good on a ceramic plate as they do in a professional bakery window.
Whether you are a gluten-free devotee or simply an enthusiast of superior textures, these cookies deliver. By utilizing the unique protein structure of oats, we achieve a soft, slightly crinkled edge and a dense, fudgy interior that stays moist for days. This is not just another cookie recipe; it is a masterclass in gluten-free chemistry and flavor balancing.

Why This Oat Flour Peanut Butter Cookie Recipe Works
- The Perfect Matte Finish: Unlike greasy cookies that spread too thin, our specific ratio of creamy peanut butter to oat flour ensures a sophisticated matte surface that highlights the beautiful cross-hatch fork marks.
- Unrivaled Texture: By using finely ground oat flour, we create a tender crumb that mimics the softest bakery-style cookies while remaining naturally gluten-free.
- Balanced Flavor Profile: The combination of rich, nutty peanut butter and high-quality vanilla is punctuated by crystals of flaky sea salt, creating a complex sweet-and-salty harmony.
- Visual Precision: Designed to match the aesthetic of a high-end food blog, these cookies feature the “crinkled edge” look that signals a professional-grade bake.
The Anatomy of Ingredients for Soft Oat Flour Baking
Fine Oat Flour (2 cups / 180g): The backbone of our Oat Flour Peanut Butter Cookies. Ensure you use a finely milled version to avoid any grittiness; it provides a soft, cake-like structure and a subtle toasted oat flavor that pairs perfectly with peanuts.
Creamy Peanut Butter (1 cup / 250g): For the specific matte finish and thick texture seen in our visuals, use a stabilized creamy peanut butter. Natural oils can sometimes cause too much spread, whereas a creamy, emulsified brand ensures the cookies hold their cross-hatch marks perfectly.
Light Brown Sugar (3/4 cup / 150g) & Granulated Sugar (1/4 cup / 50g): This dual-sugar approach is critical. Brown sugar provides the moisture for the “thick and soft” interior, while granulated sugar helps create those slightly crisp, crinkled edges.
Unsalted Butter (1/2 cup / 113g): Softened to room temperature, the butter provides the necessary fat for a rich mouthfeel. It works in tandem with the peanut butter to ensure the dough is pliable enough for the fork-press technique.
Large Egg (1 unit): Acts as the primary binder. Since oat flour lacks gluten, the protein in the egg is essential for structural integrity, preventing the cookies from becoming too crumbly.
Baking Soda (1 tsp / 5g): This leavening agent reacts with the acidic components of the brown sugar to provide a slight lift, ensuring the cookies aren’t overly dense and help achieve that light golden-brown exterior.
Vanilla Extract (1 tbsp / 15ml): High-quality vanilla enhances the natural sweetness of the oats and the savory depth of the peanuts, rounding out the flavor profile.
Flaky Sea Salt (For topping): The “visual bridge” of the recipe. A few crystals on top not only look stunning against the matte finish but also provide an essential pop of flavor that cuts through the richness.
Essential Equipment for the Perfect Cross-Hatch
To achieve the visual result described in our blueprint, you will need a few key tools. A stand mixer or electric hand mixer is vital for properly creaming the butter and sugars, which incorporates air for that soft texture. A large baking sheet lined with parchment paper prevents sticking and ensures even heat distribution for that specific light golden-brown bottom.
The most important tool for the “signature look” is a heavy-duty dinner fork. This is what you will use to create the cross-hatch marks. Additionally, a cookie scoop (2-tablespoon size) ensures every cookie is the same volume, leading to uniform baking times and a professional presentation. Lastly, a wire cooling rack is essential to stop the cooking process and prevent the bottoms from becoming soggy.

Step-by-Step Instructions: Crafting the Perfect Oat Flour Cookie
Phase 1: Preparing the Oat Flour Foundation
Begin by preheating your oven to 350°F (175°C). In a medium bowl, whisk together the oat flour, baking soda, and a pinch of fine salt. It is crucial to aerate the oat flour to remove any clumps, as this ensures the cookies have a consistent, matte texture without white pockets of unmixed flour.
Phase 2: Creaming for Volume and Softness
In your mixer, combine the softened butter, creamy peanut butter, light brown sugar, and granulated sugar. Beat on medium-high speed for 3-4 minutes until the mixture is pale and fluffy. You should see a noticeable change in color—this aeration is what makes the cookies “thick and soft” rather than flat and heavy.
Phase 3: Emulsifying the Wet Ingredients
Add the egg and vanilla extract to the creamed mixture. Beat again for another 60 seconds. Scrape down the sides of the bowl with a spatula to ensure every bit of peanut butter is fully integrated. The dough should look glossy and smell incredibly fragrant at this stage.
Phase 4: Integrating the Dry Ingredients
Turn the mixer to the lowest setting and gradually add the oat flour mixture. Mix just until the white streaks disappear. Over-mixing isn’t as much of a risk with oat flour as it is with wheat, but you still want to maintain the air you’ve beaten in. The dough should be thick, matte, and slightly tacky to the touch.
Phase 5: Rolling and the Iconic Cross-Hatch
Scoop about 2 tablespoons (approx. 40g) of dough and roll it into a smooth ball between your palms. Place the balls 2 inches (5cm) apart on the prepared baking sheet. Using your fork, press down firmly into the center of the ball until it is about 1/2 inch (1.3cm) thick. Lift the fork and press again perpendicularly to create the cross-hatch fork marks.
Phase 6: The Golden-Brown Bake
Slide the tray into the center rack of the oven. Bake for 9-11 minutes. Sensory Cue: Watch for the edges to just begin to take on a light golden-brown color. The centers should still look slightly soft and matte. Do not overbake! The cookies will firm up as they cool. Immediately upon removing from the oven, sprinkle the tops with flaky sea salt while they are still warm.
Pro-Tips for Gluten-Free Baking Success
- The 10-Minute Rest: Allow your dough to rest for 10 minutes before rolling. Oat flour is highly absorbent; this rest period allows the flour to hydrate fully, resulting in a sturdier cookie that won’t crumble.
- Sifting is Key: Oat flour can often clump in the bag. Sift it through a fine-mesh strainer to ensure the cookies have that smooth, professional matte finish.
- Peanut Butter Choice: Avoid “natural” peanut butters where the oil separates. These tend to make the cookies spread too much, losing the definition of the cross-hatch marks.
- Chilling for Thickness: If your kitchen is warm and the dough feels too soft, chill the rolled balls for 15 minutes before applying the fork marks. This ensures the cookies stay thick and “puffy.”
Serving Suggestions & Flavor Pairings
These Oat Flour Peanut Butter Cookies are a delight on their own, but they also pair beautifully with other gourmet treats. If you are hosting a dessert party, consider serving these alongside a vibrant strawberry matcha cookie for a stunning color contrast on your platter. The earthy notes of the matcha complement the nuttiness of the oats perfectly.
For a truly decadent spread, these cookies provide a nice textural counterpoint to a rich Dubai chocolate pistachio tart. If you’re looking for something lighter to serve after a meal of Vietnamese noodle salad, a single peanut butter cookie with a glass of cold almond milk is the perfect finish. They also make a great “side” to a bowl of creamy coconut rice pudding.
Frequently Asked Questions
This specific recipe uses an egg for structure and butter for flavor. You could substitute a flax egg and vegan butter, but the texture will be slightly more fragile.
Yes, you can blend rolled oats in a high-speed blender until they reach a fine, powdery consistency. However, for the smoothest matte finish, store-bought fine oat flour is recommended.
You can, but it will alter the visual. The cookies won’t have the same smooth matte finish, and the cross-hatch marks may be less defined due to the peanut chunks.
While not strictly required, letting the dough rest for 10 minutes or chilling it for 15 minutes helps the oat flour hydrate, which ensures the cookies stay thick and don’t spread too much.
Oat flour is more absorbent than wheat flour, and when combined with emulsified creamy peanut butter, it prevents the fats from ‘bleeding’ to the surface, resulting in a beautiful matte look.
The Ultimate Oat Flour Peanut Butter Cookie Recipe

Oat Flour Peanut Butter Cookies: Thick, Soft, and Gluten-Free
Ingredients
Equipment
Method
- Preheat oven to 350°F (175°C). In a medium bowl, whisk together the oat flour, baking soda, and fine salt until no lumps remain.
- In a large bowl, cream together the peanut butter, softened butter, brown sugar, and granulated sugar for 3-4 minutes until light and fluffy.
- Add the egg and vanilla extract to the creamed mixture, beating for another minute until fully combined.
- Add the dry ingredients to the wet ingredients and mix on low speed until just combined. Let the dough rest for 10 minutes to hydrate the oat flour.
- Roll 2-tablespoon portions into balls. Place on a baking sheet and use a fork to create a cross-hatch pattern, pressing until 1/2 inch thick.
- Bake for 9-11 minutes until the edges are light golden-brown and the surface is matte. Do not overbake.
- Remove from the oven and immediately sprinkle with flaky sea salt. Cool on the tray for 5 minutes before transferring to a wire rack.
Notes
Use a standard creamy peanut butter rather than a 'stir' variety for the best texture.
Closing & Call to Action
These Oat Flour Peanut Butter Cookies prove that you don’t need gluten to create a world-class dessert. With their thick profile, tender crumb, and those classic cross-hatch marks, they are sure to become a staple in your baking rotation. The matte finish and flaky sea salt topping make them a visual standout for any occasion.
Did you try this recipe? We would love to hear how yours turned out! Leave a comment below and let us know if you made any unique substitutions. Don’t forget to snap a photo and share it with us on Pinterest so we can see your beautiful bakes. Happy baking!