There is nothing quite like the snap of a perfectly chilled, homemade pickle on a sweltering afternoon. These Refrigerator Dill Pickles represent the pinnacle of summer preservation, offering a crunch that shelf-stable canned versions simply cannot replicate.
By bypassing the high-heat processing of traditional canning, we preserve the structural integrity of the cucumber’s cell walls. The result is a vibrant, neon-green snack that looks as fresh as the day it was plucked from the vine.
Whether you are tucking them into a sandwich or eating them straight from the jar, these pickles are a masterclass in balance. The sharp tang of clear vinegar brine meets the pungent depth of whole garlic and the aromatic whisper of fresh dill.

Why These Refrigerator Dill Pickles Are the Absolute Best
- Unmatched Texture: Thick-cut rounds ensure every bite has a satisfying, audible snap that stays firm for weeks.
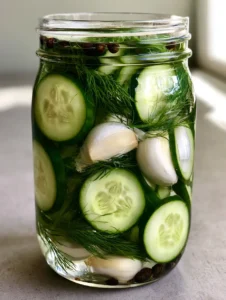
- Visual Brilliance: The crystal-clear brine showcases vibrant green skins and pale, seed-flecked centers for a Pinterest-perfect presentation.
- Flavor Depth: Using whole peeled garlic cloves and feathery dill sprigs creates a slow-infused, complex flavor profile.
- Zero Special Equipment: No pressure canners or water baths are required—just a simple glass mason jar and your refrigerator.
The Secret to That Signature Crunch: Essential Pickling Components
Choosing the right cucumber is the most critical step in your journey to the perfect pickle. For these Refrigerator Dill Pickles, you must seek out pickling cucumbers, often labeled as Kirby or Persian varieties.
Kirby cucumbers have a thicker, bumpier skin that holds up beautifully in a cold brine without becoming mushy. Avoid the standard “slicing” cucumbers found in wax coatings at the grocery store, as their thin skins and high water content lead to a soft result.
We use distilled white vinegar to maintain a crystal-clear brine that looks professional and clean. While apple cider vinegar offers a fruity note, it tints the brine brown, obscuring the beautiful layers of garlic and dill sprigs.
Pure pickling salt is non-negotiable because it lacks the anti-caking agents found in table salt. These agents can turn your brine cloudy, ruining the “handheld smartphone photo” aesthetic we are aiming for in this recipe.
Foundational Ingredients for the Perfect Brine
4 to 5 Kirby Cucumbers (approx. 1.5 lbs / 680g): These should be firm to the touch with vibrant green skins. Slice them into 1/4-inch (6mm) thick rounds to ensure they maintain their structural integrity in the jar.
1.5 cups (355ml) Distilled White Vinegar: This provides the necessary acidity for preservation while keeping the liquid perfectly transparent. It offers a sharp, clean “bite” that defines a classic dill pickle.
1.5 cups (355ml) Filtered Water: Using filtered water prevents mineral buildup from tap water, which can sometimes interact with the vinegar and affect the color of the cucumber skins.
2 tbsp (36g) Pickling Salt: This fine-grain salt dissolves instantly in the warm brine. It draws out just enough moisture from the cucumber rounds to allow the brine to penetrate deeply.
1 tbsp (12g) Granulated Sugar: A small amount of sugar doesn’t make the pickles sweet. Instead, it rounds out the harsh edges of the vinegar for a more sophisticated flavor profile.
Aromatic Infusions for Maximum Impact
6 to 8 Whole Peeled Garlic Cloves: Leaving the cloves whole allows for a gradual infusion. They look stunning wedged against the glass and become a delicious snack themselves after a few days.
1 bunch Fresh Green Dill Sprigs: Use the feathery fronds and the thinner stems for the most potent aromatic oils. The visual of green dill floating in clear brine is a hallmark of a high-quality homemade batch.
1 tbsp (10g) Whole Black Peppercorns: These provide a subtle, earthy heat that lingers on the back of the palate. They also add a beautiful speckled contrast to the pale centers of the cucumber slices.
1/2 tsp (1g) Red Pepper Flakes (Optional): If you prefer a “hot” refrigerator pickle, a pinch of flakes adds a slow burn without overwhelming the dill.
Tools Required for Professional Results
To achieve the look of a vertical glass mason jar filled to the brim, you will need a 1-quart (1 liter) wide-mouth glass mason jar. A wide mouth makes it significantly easier to layer the thick-cut rounds and aromatics neatly.
A sharp chef’s knife or a mandoline is essential for creating uniform slices. Consistency in thickness ensures that every piece of cucumber pickels at the same rate, preventing some from being too salty while others remain bland.
A small stainless steel saucepan is needed to heat the brine. Avoid reactive metals like aluminum or unlined copper, as the high acidity of the vinegar can leach a metallic taste into your Refrigerator Dill Pickles.

Mastering the Brine: How to Make Refrigerator Dill Pickles Step-by-Step
Preparing the Cucumber Rounds
Wash the cucumbers thoroughly in cold water to remove any dirt or debris. Trim about 1/16th of an inch from the blossom end of each cucumber; this end contains enzymes that can cause softening.
Slice the cucumbers into rounds exactly 1/4-inch (6mm) thick. You want to see those beautiful seed-flecked centers surrounded by a ring of vibrant green skin.
Sterilizing and Layering the Jar
While you don’t need a full canning bath, your mason jar must be impeccably clean. Wash it in hot, soapy water and dry it thoroughly before use.
Begin by placing half of the fresh dill sprigs and three garlic cloves at the bottom of the jar. Pack the cucumber rounds tightly on top, pausing halfway through to tuck the remaining garlic and dill against the glass walls.
Crafting the Crystal-Clear Brine
In your saucepan, combine the vinegar, water, salt, and sugar. Bring the mixture to a simmer over medium heat, stirring until the salt and sugar are completely dissolved.
Remove the brine from the heat and let it cool for about 5 to 10 minutes. Pouring boiling-hot brine directly onto the cucumbers can “cook” them slightly, leading to a softer texture.
The Final Infusion
Scatter the whole black peppercorns over the top of the cucumbers. Carefully pour the warm brine into the jar, ensuring it covers the cucumbers completely while leaving about 1/2 inch (1.25cm) of headspace at the top.
Tap the jar gently on the light-toned countertop to release any trapped air bubbles. Screw the metal lid on firmly and let the jar sit at room temperature until it is cool to the touch.
Expert Tips for the Ultimate Snap
- The Ice Bath Trick: For the absolute crunchiest Refrigerator Dill Pickles, soak your sliced cucumber rounds in a bowl of ice water for 30 minutes before packing them into the jar.
- Don’t Skip the Trim: As mentioned, removing the blossom end is scientifically proven to keep pickles firmer for longer.
- Patience is a Virtue: While you can eat these after 24 hours, the flavor peaks after about 5 to 7 days in the refrigerator.
- Keep Them Submerged: If the cucumbers float above the brine, they may soften or discolor. Use a small glass fermenting weight if necessary.
Shelf Life and Storage Advice
These pickles must be stored in the refrigerator at all times. Because they are not heat-processed, they are not shelf-stable and will spoil if left in the pantry.
Your Refrigerator Dill Pickles will stay crisp and delicious for 4 to 6 weeks. After this point, they are still safe to eat, but the texture may begin to soften slightly as the acid breaks down the pectins.
Always use a clean fork to remove pickles from the jar. Introducing bacteria from your fingers or a used utensil can significantly shorten the shelf life of the batch.
What to Serve With Your Homemade Pickles
These pickles are the perfect acidic foil for rich, savory dishes. Try them alongside a refreshing strawberry pecan chicken salad for a delightful lunch pairing.
They are also a mandatory side for any summer gathering. Imagine them plated next to smoky baked beans with bacon or served as a palate cleanser after a bowl of creamy elote dip.
If you are planning a full menu, these pickles are a great addition to your rotation of summer crockpot recipes. They add a bright, fresh element to slow-cooked meats.
For a unique twist, chop up the leftovers and fold them into a salt and vinegar potato salad to double down on that tangy, puckery flavor profile.
Frequently Asked Questions
Yes, but it will change the color and flavor. White vinegar keeps the brine crystal clear and provides a sharp tang, while apple cider vinegar adds a fruity note and a brownish tint.
Heating the brine is necessary to dissolve the salt and sugar properly and to help the aromatics like garlic and dill release their oils more effectively into the liquid.
They are best consumed within 4 to 6 weeks. While they remain safe to eat longer due to the vinegar acidity, they will gradually lose their signature crunch.
Soft pickles result from using the wrong cucumber variety (like waxy slicers), failing to trim the blossom end, or pouring boiling-hot brine directly onto the vegetables.
Cloudy brine is usually caused by using table salt with anti-caking agents or using hard tap water. To ensure a clear brine, always use pure pickling salt and filtered water.
The Final Recipe: Crisp Refrigerator Dill Pickles

Refrigerator Dill Pickles: The Ultimate Garlic-Infused Extra-Crunchy Guide
Ingredients
Equipment
Method
- Wash the Kirby cucumbers and trim the blossom ends. Slice into uniform 1/4-inch (6mm) rounds.
- Place half the dill and 3 garlic cloves in a clean mason jar. Pack the cucumber rounds tightly, layering the remaining garlic and dill throughout.
- In a saucepan, combine vinegar, water, salt, and sugar. Heat until simmering and solids are dissolved. Let cool for 5-10 minutes.
- Add peppercorns to the jar and pour the warm brine over the cucumbers. Secure lid, let cool to room temperature, and refrigerate.
Notes
The flavor is best after 5 days of aging in the fridge.

Start Your Pickling Journey Today!
Making your own Refrigerator Dill Pickles is a culinary rite of passage that yields immediate, delicious rewards. Once you taste the difference between a mass-produced spear and a homemade round infused with fresh garlic and dill, you will never go back.
If you enjoyed this recipe, please leave a comment below and tell us how yours turned out! Don’t forget to sign up for our newsletter for more seasonal inspiration and share your beautiful jar photos to Pinterest.