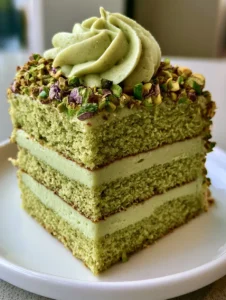
When it comes to high-end patisserie, the Pistachio Mascarpone Cake Filling is the undisputed queen of textures. Imagine slicing into a towering, three-layer masterpiece where the sponge is as light as air and the filling is as dense and velvety as Italian silk. This isn’t just a recipe; it is a blueprint for achieving that specific, pale sage-green aesthetic found in the world’s most exclusive bakeries.
Whether you are preparing a celebratory centerpiece or simply honing your pastry skills, mastering this filling is a game-changer. It provides a structural stability that ordinary buttercream lacks, ensuring your cake layers stay perfectly aligned while offering a sophisticated, nutty flavor profile that isn’t overly sweet. The secret lies in the marriage of high-fat Italian mascarpone and the intense essence of roasted pistachios.
In this guide, we will walk through the forensic details of creating a 1/2-inch thick, perfectly smooth layer of pistachio cream. We will also cover the construction of the moist pistachio sponge cake shown in our visuals, ensuring your final result is a carbon copy of professional-grade dessert photography. Let’s dive into the science of the perfect pistachio crumb and the art of the piped mascarpone swirl.

Why This Pistachio Mascarpone Cake Filling Is a Pastry Chef’s Favorite
- Unrivaled Stability: Unlike whipped cream, this mascarpone-based filling is dense enough to support multiple heavy sponge layers without bulging or compressed edges.
- The “Sage-Green” Aesthetic: By using a combination of fine pistachio flour and pure paste, we achieve a natural, sophisticated pale green hue that looks stunning against white ceramic.
- Multi-Sensory Texture: You get the softness of the moist sponge, the silkiness of the 1/2-inch thick filling, and the crunch of roughly chopped roasted pistachios.
- Balanced Sweetness: The tang of the mascarpone cuts through the sugar, allowing the earthy, roasted notes of the nuts to take center stage.
The Anatomy of Ingredients for the Perfect Pistachio Cake
Cold Mascarpone Cheese: Use 16 oz (450g) of full-fat Italian mascarpone. This is the structural foundation of our Pistachio Mascarpone Cake Filling, providing the “dense and perfectly smooth” texture required for those thick layers.
Pure Pistachio Paste: You will need 1/2 cup (120ml) of unsweetened pistachio paste. This provides the “pale sage green” color and deep nuttiness without adding the grittiness of whole nuts into the cream.
Heavy Whipping Cream: 1 cup (240ml) of cold heavy cream (at least 36% fat). This is folded into the mascarpone to aerate the filling just enough to make it pipeable for that signature top swirl.
Powdered Sugar: 1.5 cups (180g) of sifted confectioners’ sugar. Sifting is non-negotiable to ensure the filling remains “perfectly smooth” as described in our visual blueprint.
Roasted Pistachio Nuts: 1/2 cup (60g) of whole roasted pistachios. These are roughly chopped for the garnish, specifically chosen for their vibrant green interiors and brownish-purple skins to provide visual contrast.
Pistachio Flour: 1 cup (120g) of finely ground pistachios for the sponge. This ensures a “fine crumb” and a “light green” interior for the three sponge layers.
Foundational Baking Essentials: 2 cups (250g) all-purpose flour, 1.5 tsp (7g) baking powder, and 1/2 tsp (3g) fine sea salt. These invisible ingredients are scientifically necessary for the sponge to rise and hold its structure.
Essential Equipment for Bakery-Quality Results
To achieve the “thick, piped decorative swirl” and the “perfectly smooth” layers, you will need a few specific tools. A stand mixer with a whisk attachment is vital for emulsifying the mascarpone without it curdling. A large piping bag fitted with a closed star tip (like a Wilton 2D) is required for the decorative top garnish.
For the assembly, an offset spatula is your best friend. It allows you to spread the Pistachio Mascarpone Cake Filling to an exact 1/2-inch thickness across the light green sponge. Finally, ensure you have three 8-inch cake pans to create the distinct three-layer foundation shown in the visual prompt.

Step-by-Step Evolution of the Pistachio Masterpiece
Crafting the Moist Light Green Sponge
Begin by whisking your dry ingredients: the all-purpose flour, pistachio flour, baking powder, and salt. In your stand mixer, cream 1 cup (225g) of softened butter with 1.5 cups (300g) of granulated sugar until pale and fluffy. This process, known as creaming, traps air bubbles that will expand in the oven, creating that “soft, moist” fine crumb.
Add 4 large eggs one at a time, followed by 1 tsp (5ml) of pure vanilla extract. Gradually alternate adding the dry ingredients and 1 cup (240ml) of whole milk. The batter should be a natural light green. Divide the batter into three pans and bake at 350°F (175°C) for 25-30 minutes until a toothpick comes out clean.
Whipping the Pistachio Mascarpone Cake Filling
In a chilled bowl, combine the cold mascarpone and the pistachio paste. Use the whisk attachment on medium speed until just combined. It is critical not to overbeat at this stage, as mascarpone has a high fat content and can turn into butter if overworked.
Slowly pour in the heavy whipping cream while the mixer is running. Once the mixture starts to thicken, add the sifted powdered sugar. Continue whisking until stiff peaks form. The result should be a dense, pale sage green cream that holds its shape perfectly.
The Art of Professional Layering
Place your first sponge layer on a white ceramic plate. Using your offset spatula, apply the Pistachio Mascarpone Cake Filling until it is exactly 1/2-inch thick. Ensure the filling reaches the very edge of the cake for a clean, professional profile. Repeat with the second and third layers.
The Final Flourish: Piping and Garnishing
Fill your piping bag with the remaining cream. Starting from the center of the top layer, pipe a thick decorative swirl, moving outward in a steady motion. This creates the “piped mascarpone frosting swirl” seen in the visual prompt. Finally, take your roasted pistachios and roughly chop them, ensuring the brownish-purple skins stay attached for that rustic, unedited aesthetic. Scatter them generously over the top.
Expert Tips for a Perfectly Smooth Finish
- Temperature Control: Always use cold mascarpone and cold heavy cream. If the mascarpone is too warm, the filling will lose its density and fail to support the 1/2-inch thickness.
- The Sift Secret: Never skip sifting your powdered sugar. Even the smallest clump will ruin the “perfectly smooth” visual of the sage green filling.
- Avoid Over-Mixing: Watch for sensory cues: as soon as the whisk leaves clear tracks in the cream and it holds a peak, stop the mixer. Over-mixing will cause the filling to look grainy rather than silky.
- Natural Color: If your pistachio paste isn’t yielding that “pale sage green,” you can add a single drop of leaf green gel coloring, but use it sparingly to keep the “unedited realistic aesthetic.”
Preservation and Storage Guidelines
Because of the high dairy content in the Pistachio Mascarpone Cake Filling, this cake must be stored in the refrigerator. Place it in a cake carrier or cover loosely with plastic wrap to prevent the sponge from drying out. It will stay fresh and moist for up to 3 days.
For freezing, it is best to freeze individual slices. Wrap each slice tightly in parchment paper and then foil. When you are ready to enjoy, thaw in the refrigerator overnight. The mascarpone filling holds up remarkably well to freezing, maintaining its dense texture upon thawing.
What to Serve with Your Pistachio Masterpiece
This rich, nutty cake pairs beautifully with other sophisticated desserts and light meals. If you are hosting a brunch, consider serving it alongside a Key Lime Bundt Cake for a citrusy contrast. For a dessert spread, it complements the flavors of a Dubai Chocolate Pistachio Tart perfectly.
If you prefer a fruitier pairing, these Strawberry Matcha Cookies share a similar earthy green palette. For those looking for a lighter finish after a meal of Coconut Rice Pudding, a small slice of this pistachio cake provides the perfect textural encore.
Frequently Asked Questions
While similar, pistachio paste is usually more finely ground and unsweetened. If using pistachio butter, ensure it is smooth and adjust the powdered sugar in the recipe to account for any added sweeteners.
Yes, because the filling is made primarily of mascarpone and heavy cream, the cake should be kept refrigerated until about 30 minutes before serving to maintain food safety and structural integrity.
The sage green color comes from using high-quality, pure pistachio paste and pistachio flour. The natural chlorophyll in the nuts provides a sophisticated, muted green without the need for artificial dyes.
Yes, due to the high fat content of mascarpone and the addition of heavy cream whipped to stiff peaks, this filling is exceptionally stable and can support multiple sponge layers without bulging.
Mascarpone can easily over-emulsify and turn into butter if beaten too long or at too high a speed. Always whisk on medium speed and stop as soon as stiff peaks form.
The Ultimate Pistachio Mascarpone Cake Filling Recipe Card

Pistachio Mascarpone Cake Filling: The Ultimate Guide to Professional Sage-Green Layers
Ingredients
Equipment
Method
- Cream butter and sugar, then add eggs and vanilla. Alternate adding dry ingredients (including pistachio flour) and milk until a light green batter forms.
- Divide into three pans and bake at 350°F (175°C) for 25-30 minutes. Cool completely before filling.
- Whisk cold mascarpone and pistachio paste on medium speed until smooth and pale sage green.
- Slowly add heavy cream and sifted powdered sugar. Whisk until stiff, dense peaks form.
- Spread a 1/2-inch thick layer of filling between each sponge layer using an offset spatula.
- Pipe a decorative swirl on top and scatter with roughly chopped roasted pistachios.
Notes
Sift powdered sugar for a perfectly smooth texture.

Final Thoughts on the Perfect Pistachio Slice
Creating a professional-grade Pistachio Mascarpone Cake Filling is about respecting the ingredients and the process. From the fine crumb of the light green sponge to the dense, sage-colored layers of cream, every element works in harmony to create a dessert that is as visually stunning as it is delicious. The roasted pistachio garnish provides that final “handheld smartphone photo” realism that makes this recipe a standout.
We invite you to share your baking journey with us! If you found this guide helpful, please leave a comment below or share your creations with our community. For more culinary inspiration and high-RPM recipes, be sure to follow us on Pinterest and join our newsletter for weekly updates.