There is nothing quite like the magic of a holiday gathering where the dessert table looks like a professional pastry chef’s showcase. These Santa Hat Cheesecake Bites are designed to be that show-stopping centerpiece, combining the creamy decadence of a classic cheesecake with the whimsical charm of Old Saint Nick himself. Whether you are hosting a formal Christmas dinner or a casual gift exchange, these miniature treats deliver high visual impact and even higher flavor profiles.
The beauty of these Santa Hat Cheesecake Bites lies in their forensic-level detail, specifically the contrast between the vibrant red strawberries and the pristine white whipped cream. We have engineered this recipe to ensure that every bite is structurally sound, featuring a buttery, thick graham cracker crust that provides the perfect crunch against the velvety ivory cheesecake filling. This is a dessert that looks like it stepped right out of a high-end food magazine, yet it is approachable enough for any home baker to master.
When you serve these on a clean white ceramic platter, as suggested by our culinary blueprints, the natural daylight will catch the gloss of the fresh strawberries and the delicate texture of the piped cream. They are the epitome of festive cheer, offering a balanced sweetness that isn’t overwhelming. Let’s dive into the science and artistry of creating the perfect holiday cheesecake bite.

Why These Festive Mini Treats Command the Holiday Table
- Textural Harmony: A thick, round buttery graham cracker crust provides a sturdy, crunchy foundation for the smooth, chilled cheesecake layer.
- Visual Precision: Whole, vibrant red strawberries are used to mimic the iconic Santa hat, ensuring a uniform and professional appearance.
- Gourmet Aesthetics: Textured rings of piped white whipped cream and delicate “pom-pom” dollops create a high-definition holiday look.
- Perfect Portions: These bite-sized treats are ideal for party grazing, allowing guests to enjoy a rich dessert without the need for forks or plates.
- Photogenic Appeal: Designed to look stunning in handheld smartphone photos, these bites are guaranteed to be the star of your social media feed.
The Anatomy of a Perfect Christmas Cheesecake Bite
To achieve the “pale ivory-colored” cheesecake layer described in our visual blueprint, we focus on high-quality ingredients and a gentle baking process. The cheesecake is not just a carrier for the strawberry; it is a sophisticated custard that must be creamy and dense. Using room-temperature ingredients is the first scientific rule of cheesecake—this ensures a smooth emulsion without over-incorporating air, which causes unsightly bubbles.
If you enjoy experimenting with different flavor profiles in your baking, you might find that the bright notes in these bites pair wonderfully with other fruity favorites like lemon raspberry cookies. Much like those cookies, these cheesecake bites rely on the interplay between rich fats and acidic fruit. The strawberry isn’t just a hat; its natural tartness cuts through the heavy cream cheese, creating a perfectly balanced palate experience.
The crust is equally important. We don’t settle for a thin, flimsy base. We want a “thick, round buttery graham cracker crust” that can be held comfortably. By using a higher ratio of melted butter to crumbs, we create a base that mimics a shortbread in stability but retains that classic graham honey flavor. This ensures the bite doesn’t crumble when your guests pick it up from the platter.
Essential Ingredients for the Festive Foundation
Graham Cracker Crumbs (1.5 cups / 150g): These provide the sandy, honey-sweet base. Use finely pulsed crumbs to ensure the crust packs tightly and holds its round shape.
Melted Salted Butter (5 tbsp / 70g): Butter acts as the glue for our crust. The salt helps to balance the sugar in the filling, providing a professional depth of flavor.
Full-Fat Cream Cheese (16 oz / 450g): This is the heart of the ivory cheesecake layer. It must be brick-style and fully softened to achieve that “smooth, pale ivory” look without lumps.
Granulated Sugar (1/2 cup / 100g): We use just enough sugar to sweeten the cheese without making it cloying, allowing the strawberry’s natural sweetness to shine.
Large Eggs (2 units): Eggs provide the structure and the rich, custard-like mouthfeel. They should be at room temperature to prevent the batter from seizing.
Pure Vanilla Extract (1 tsp / 5ml): A touch of vanilla enhances the creamy notes and contributes to the sophisticated ivory color profile.
Fresh Strawberries (18-24 whole): Look for medium-sized, conical strawberries. They must be vibrant red and hulled so they sit flat on the cheesecake.
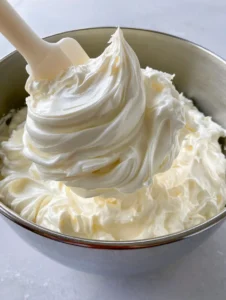
Heavy Whipping Cream (1 cup / 240ml): This must be cold to whip into a “thick, textured” frosting. It forms both the brim and the pom-pom of the hat.
Powdered Sugar (2 tbsp / 30g): This sweetens the cream and acts as a minor stabilizer to keep those piped rings looking sharp for hours.
Must-Have Tools for Culinary Precision
Achieving the handheld smartphone photo aesthetic requires the right equipment. A standard mini muffin tin is essential for creating those “thick, round” bases. You will also need paper liners to ensure easy removal without damaging the delicate cheesecake edges. For the iconic Santa hat look, a piping bag fitted with a small star tip is required to create the “thick, textured ring” of cream at the base of the strawberry.
If you find yourself wanting to branch out into more complex toppings in the future, mastering the use of a piping bag is a gateway skill. For instance, once you can pipe whipped cream, you can easily transition to drizzling a rich chocolate ganache over other desserts. For this recipe, however, we stay focused on the clean, white whipped cream to maintain the Santa theme.

Step-by-Step Instructions for Santa Hat Success
Crafting the Buttery Graham Cracker Base
Preheat your oven to 325°F (160°C). Line a mini muffin tin with paper liners. In a medium bowl, combine the graham cracker crumbs, granulated sugar, and melted butter. Stir until the mixture resembles wet sand.
Spoon approximately one tablespoon of the mixture into each liner. Use the back of a small spoon or a tamper to press the crumbs down firmly. You are looking for a compact, even layer. Bake for 5 minutes just to set the crust, then remove from the oven and let cool while you prepare the filling.
Mixing the Velvety Ivory Cheesecake Filling
In a large bowl, beat the softened cream cheese and sugar together on medium speed. Stop as soon as the mixture is smooth and ivory-colored. Do not over-mix, as this introduces air bubbles that can cause cracking.
Add the vanilla extract and then the eggs, one at a time. Mix on low speed just until the yellow of the egg disappears. Sensory cue: the batter should look like heavy satin. Pour the filling over the pre-baked crusts, filling each cup about 3/4 of the way to the top.
The Gentle Bake and Chill Cycle
Bake the mini cheesecakes for 15-18 minutes. Look for the “Visual Cue”: the edges should be set and slightly puffed, but the center should still have a very slight, jiggle. They should not brown; we want to maintain that pale ivory color.
Remove from the oven and let them cool completely in the pan at room temperature. Once cool, transfer the pan to the refrigerator and chill for at least 3 hours, though overnight is best. This chilling stage is critical for the “chilled cheesecake layer” texture required for a clean bite.
Architecting the Santa Hat Topper
Prepare the strawberries by washing them and patting them completely dry. Hull the strawberries by slicing off the leafy green top so that the strawberry has a flat base. Sensory cue: the strawberry should be able to stand upright on its own without leaning.
In a cold bowl, whip the heavy cream and powdered sugar until stiff peaks form. The cream should be thick enough to hold its shape when piped. Transfer the cream to a piping bag fitted with a star tip.
Place one strawberry, point-side up, in the center of each chilled cheesecake. Pipe a “thick, textured ring” of whipped cream around the base of the strawberry. Finally, change to a small round tip (or just use the star tip) to pipe a “small, round dollop” onto the very tip of each strawberry to complete the hat.
Expert Tips for Success
- The Temperature Rule: Ensure your cream cheese and eggs are at room temperature. This is the only way to get that “smooth, pale ivory-colored” filling without unsightly lumps.
- Dry Those Berries: If your strawberries are even slightly damp, the whipped cream will slide right off. Use a paper towel to ensure they are bone-dry before assembling.
- Stabilize Your Cream: If you are serving these at a long party, consider adding a teaspoon of instant pudding mix or a specialized cream stabilizer to the whipped cream to prevent wilting.
- The Clean Release: Use a thin knife to gently loosen any cheesecake that might have stuck to the top of the liner before peeling the paper away for a pristine look.
The Best Ways to Store and Prep Ahead
These Santa Hat Cheesecake Bites are excellent candidates for advanced preparation. You can bake the cheesecake bases up to two days in advance and keep them in the refrigerator. However, for the best visual results, do not add the strawberries or the whipped cream until the day you plan to serve them.
Once fully assembled, the strawberries will begin to release moisture after about 4-6 hours. If you have leftovers, store them in an airtight container in the fridge. Note that the “pom-pom” on top may soften over time. We do not recommend freezing the fully assembled bites as the fresh strawberries will become mushy upon thawing.
What to Serve With Your Holiday Cheesecakes
These bites are rich and creamy, so they pair beautifully with a variety of holiday beverages. A hot cup of cocoa or a spiced latte provides a cozy contrast to the chilled cheesecake. If you are building a larger dessert board, consider adding a variety of textures.
For a complete fruit-focused dessert spread, you might include slices of a fresh peach cake if you are in a warmer climate, or perhaps some dark chocolate elements to contrast the white cream. The clean white ceramic platter makes these bites stand out, so keep your other offerings equally elegant to maintain the aesthetic.
Frequently Asked Questions
You can freeze the cheesecake bases (crust and filling) for up to a month. However, do not freeze the fresh strawberries or whipped cream decoration, as they will lose their texture upon thawing.
Yes, you can substitute the baked filling with a mixture of cream cheese, powdered sugar, and whipped cream, though the baked version offers a more authentic ivory color and superior stability for the strawberry hat.
Use a stabilized whipped cream by adding a small amount of cornstarch or instant vanilla pudding mix during the whipping process. Keep the bites refrigerated until the moment of serving.
Medium-sized, conical strawberries work best. They should be wide enough to cover most of the cheesecake surface but not so large that they become top-heavy and tip over.
Cracking is usually caused by over-mixing air into the batter or over-baking. Ensure you mix on low speed and remove them from the oven while the center is still slightly wobbly.
The Ultimate Santa Hat Cheesecake Bites Recipe

Santa Hat Cheesecake Bites: The Ultimate Festive Holiday Dessert
Ingredients
Equipment
Method
- Combine graham cracker crumbs, sugar, and melted butter. Press 1 tablespoon into each lined mini muffin cup.
- Bake at 325°F (160°C) for 5 minutes. Remove and cool.
- Beat softened cream cheese and sugar until smooth and ivory-colored. Add vanilla and eggs one at a time on low speed.
- Fill cups 3/4 full. Bake for 15-18 minutes until edges are set but the center has a slight jiggle.
- Cool at room temperature, then refrigerate for at least 3 hours.
- Beat heavy cream and powdered sugar until stiff peaks form. Transfer to a piping bag.
- Place a flat-bottomed strawberry on each cheesecake. Pipe a textured ring around the base and a small dollop on the tip.
Notes
Ensure strawberries are completely dry before adding whipped cream to prevent sliding.

Share the Holiday Spirit and Get Baking!
These Santa Hat Cheesecake Bites are more than just a dessert; they are a festive experience that brings joy to any holiday table. By following our forensic culinary guide, you have ensured that every element—from the buttery crust to the piped cream—is executed with professional precision. The combination of chilled, ivory cheesecake and vibrant red strawberries is a timeless classic that will have your guests asking for the recipe.
We would love to see how your holiday bites turned out! Did you use a specific piping tip? Did you serve them on a special heirloom platter? Leave a comment below and share your success. If you enjoyed this recipe, please consider signing up for our newsletter for more elite culinary guides and sharing this post to Pinterest so others can join in the festive fun!